So after it took me NINE months to make Chewys sweater (that BARELY fits now) I decide to make him a cabled vest out of the same Sirdar booklet, and only gave myself a month to complete it. *ZOINKS* I also have a big thick book to read for our book club and we are visiting some friends later in the month. Oiy Vey!
And of course the slave driver (I mean lovely middle child of mine) is requesting a pteranodon and cat toy ASAP. Yeah, good luck with that kid. I need to teach him how to knit these himself! ;)
Saturday, March 13, 2010

Monday, February 22, 2010
Hallelujah its DONE!
Chewy's sweater of doom! LOL Took FOR-EV-AH but it's done done done. A bit snug already. I'll have to block it later.


Saturday, February 20, 2010
More recent projects


iPhoodie!

I saw this amazingly cute pattern by clickertyclick, a sweater for your ipod! It was from almost 4 yrs ago, but the deminsions fit the new itouch or iphone. I started knitting it and thought, ew, don't like seaming! How about a pocket, wait! lets leave this section out... After contacting the original designer, she agreed I can post my mods for the pattern! It's a free ravelry download, or check it out here! :) Thanks to Linda from ClickertyClick!
I present to you all, the iPhoodie! (that's iPod/iPhone Hoodie but I thought I was being hysterical with the mashup spelling. My 10 yr old said that was lame and call it a sweater. LOL can't please them all!)
iPhone Hoodie
(pattern modified from clickertyclick. Original pattern can be found at http://clickertyclick.blogspot.com/2006/07/at-last.html)
Materials needed:
US size 3 (3.25mm) straight needles and 4 size 3 DPNs
Worsted weight yarn
4 stitch markers
2 pieces of scrap yarn
Yarn/tapestry needle
Gauge: not important to the integrity of the pattern
Techniques used:
KFB = knit in the front and back of the same stitch
3 needle bind off = see http://www.knittinghelp.com/videos/casting-off and scroll to the bottom to watch the video on this technique.
Pattern:
Cast on 22 stitches on straight needles. Work in stockinette until the piece measures 2.5 – 3 inches (or approx 7cm) ending with a purl row.
Divide the stitches placing a stitch marker as you knit the next row as follows: K3, place marker, K4, place marker, K8, place marker, K4, place marker
Now you are ready for the increasing. Purl the next row then work as follows: Row 1: K2, KFB, move marker, KFB, K2, KFB, move marker, KFB, K6, KFB, move marker, KFB, K2, KFB, move marker, KFB, K2 Row 2: Purl all stitches.
Repeat rows 1 and 2 until there are 10 stitches before the first marker and purl the next row.
Now you are ready to set aside the sleeves. K10, remove marker and place those 18 stitches between the marker on scrap yarn, Knit until the next marker, remove marker and place those 18 stitches between the marker on scrap yarn, knit to the end. You should have 42 stitches. Purl the next row.
Switch to DPNs kniting in the round. K 14 on each of 3 needles. Work in the round until the entire body measures 4 inches (10 cm). K1, P1 for 7 rows, then do a 3 needle bind off to seam up the bottom of the sweater.
Now it's time to pick up your sleeve stitches. Knit the 18 stitches onto 3 DPNs and work in the round until the sleeve measures 3 inches (approx 8cm). K1, P1 for 4 rows and cast off normally (not 3 needle bind off).
Repeat this for the other sleeve.
Time for the pouch... Pick up 7 stitches in the middle of the sweater approx. 2 rows below the v of the neck. Row 1: knit Row 2: purl Row 3: KFB, K5, KFB Row 4: purl Row 5: KFB, K7, KFB Row 6: purl Row 7: KFB, K9, KFB Row 8: purl Row 9: KFB, K11, KFB Row 10: purl Row 11: knit all stitches Row 12: purl Cast off and seam to the front of the sweater approx 2 rows above the first ribbing row.
Seam the top of the hood together by folding in half and stitching across the top. Weave in all your ends.
You can pick up stitches around the opening to add a fun trim or add a 3 stitch I cord to each side of the hood for the strings. If you want to keep the sleeves from hanging free, you can stitch them to the inside of the pouch or side of the sweater. Or, let them cover your headphone cords. You could even try some intarsia on the back of the hoodie for an interesting and creative look!
© clickertyclick and CoffeeBra
Saturday, February 13, 2010
Godzilla vs. Mothra
My 5 yr old is obsessed with Godzilla movies. Old and New. We've seen the Matthew Broderick one I think 300 times now. LOL After making him the sea monster, he requested Godzilla. Um, I'm not that great at faces, so he's been looks like he had a few too many drinks. Mothra was knit by yarn donated by Knitschmidt. It was the PERFECT colors!
Here is the toy my son has that he wanted me to recreate...

And Mothra

Godzilla

Mothra Vs. Godzilla

My son then drew a picture at school to make sure I got them as accurate as possible. ;) Did I do a good job?

Here is the toy my son has that he wanted me to recreate...
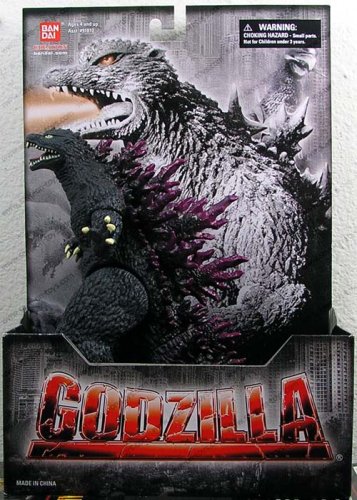
And Mothra

Godzilla

Mothra Vs. Godzilla

My son then drew a picture at school to make sure I got them as accurate as possible. ;) Did I do a good job?

Monday, January 25, 2010
Back at it!
Update on the baby, he's growing and doing great! finally saying mama and even cruising the furniture! Our goal is to have him walking by his 2nd birthday this April. :)
So now with the break in all our Dr appts, I've actually got some knitting and crocheting done! Check my ravelry page to see all the projects... Coffeebra's Projects
A few pics...
tea cup pin cushion from lion brand's website

Owl from Harry Potter for my oldest son

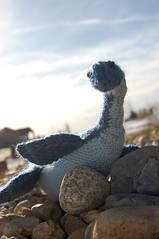
And a Sea Monster for the middle kid.

Now I'm working on another tea cup for a friend and trying to knit a Godzilla for my middle son. He's obsessed with every movie ever made. LOL
So now with the break in all our Dr appts, I've actually got some knitting and crocheting done! Check my ravelry page to see all the projects... Coffeebra's Projects
A few pics...
tea cup pin cushion from lion brand's website

Owl from Harry Potter for my oldest son
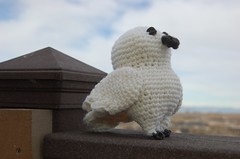
And a Sea Monster for the middle kid.
Now I'm working on another tea cup for a friend and trying to knit a Godzilla for my middle son. He's obsessed with every movie ever made. LOL
Sunday, November 8, 2009
I'm hoping to be back to knitting soon!
We have some sort of diagnosis for the little one. He has Dyspraxia, Hypotonia, Global Developmental Delays, Developmental Coordination Disorder, Speech Apraxia and a host of other really long terms. Basically the Dyspraxia covers most of it all. He receives 4 therapies a week and goes to many specialists. He soon will be wearing special ankle/foot braces to help him stand more. He also is a former self starver and still Failure to Thrive so it's an every day battle to get him to eat. Doesn't help that he also is allergic to Milk, Soy and Citric Acid and will be having formal allergy testing done soon to see what else. Dealing with him has been a 24/7 job. I have sooooo many projects and patterns swirling in my head, I just need to get back into them. I thought I'd be knitting at the Dr.'s office and during therapy but all of the things he is dealing with require hands on attention. I've gotten over my Google obsession trying to diagnose him myself, but replaced that with a Chick Lit book obsession. I am hoping the knitting obsession can come back so i can finish the sweater I've been making him since MAY!
Sunday, September 13, 2009
Getting back in the swing of things...
My youngest has had such a rough go of things in the whole "normal development" for babies. He's almost 18 months and yet to walk, in fact he's far from it still. We have yet to get a diagnosis for whatever is going on, but not for lack of trying. I will hopefully get back to knitting now that we are getting into a routine of the various dr. appts and therapies and getting the older boys to and from school and their activities.
Just wanted ya'll to know, I'm still here! I'm still working on some new free patterns to add to ravelry, just dealing with a few of life's curve balls first.
Just wanted ya'll to know, I'm still here! I'm still working on some new free patterns to add to ravelry, just dealing with a few of life's curve balls first.
Sunday, August 16, 2009
New Pattern coming... "Don't Call Me Victoria" Scarf
My mom's name is Vicki, people almost always assume its short for another name. Nope, just Vicki. She especially hates it when people call her Victoria. I wanted to knit her a scarf in her favorite greens and blues. Found the perfect yarn, FiberNatura - Heaven, a Merino/Silk mix that's "heaven" to knit up! Searched Ravelry for hours, consulted my trusty The Harmony Guide, Lace & Eyelets and poured through the lacy patterns. I wanted something somewhat light, LOVE the snowflake stitches, but fall themed. Settled on the Fern Lace stitch and wrote up a super quick and easy pattern for the perfect sized scarf! I'm knitting it up now and will publish it on here as soon as it's finished!
Here is a teaser, bad picture, but you'll get the idea. ;)

Here is a teaser, bad picture, but you'll get the idea. ;)

Monday, August 10, 2009
The Sweater that Killed Me...
My obituary shall read, "cause of death, self inflicted knitting needle stabbing to the eyeballs and brain" My final project?? Chewy's fall sweater.
I cast on in May, got bored, set it aside, and now that its getting closer to fall, I really want to finish it. It's adorable, but man, it's made with some tiny-arse needles and a pattern that makes me want to stab my eyeballs. It's cute as hell, but boringggggg.
So motivate me to finish this thing! I have the back panel complete and working on the front. Below is a pic of when I first cast on and the pic of the pattern itself. Soooo cute, but may kill me in the process.
I cast on in May, got bored, set it aside, and now that its getting closer to fall, I really want to finish it. It's adorable, but man, it's made with some tiny-arse needles and a pattern that makes me want to stab my eyeballs. It's cute as hell, but boringggggg.
So motivate me to finish this thing! I have the back panel complete and working on the front. Below is a pic of when I first cast on and the pic of the pattern itself. Soooo cute, but may kill me in the process.
Ocean Waves Baby Blanket
The finished product... :) I'll write the pattern later, but the stitch came from The Harmony Guide - Basic Crochet Stitches - Wavy Shells II


Sunday, June 21, 2009
Crocheted baby blanket!
I'll be posting a pattern and pics as soon as I get this finished! using the wavy shell stitch II from the Interweave Basic Crochet Stitches book, I'm making a super super cute blanket for my soon-to-be new niece! The nursery is all ocean and painted in a soft turquoise/aqua and sand. My SIL is amazingly crafty and handpainted bits and pieces on the wall, trees, sand castles, all sorts of cute things! This blanket falls in line with that. I chose Lion Brand Nature's Choice Organic Cotton in Macadamia (Sand) and Almond (foam) and Cascade Luna in Seafoam (ocean) and threw in some LBNCOC (wow! long acronym!) in strawberry and wove the ends around every once in a while as seashells in the sand. I'm very proud of this blanket and cannot wait to finish and show it off! And to share the pattern of course! :D So watch for that!!!
I have a whole line of the StarWars guys I want to get the patterns written for and them completed too. It's been hard since my youngest child has been going through some feeding issues and delays, so hopefully I'll find more time to knit and crochet to help keep my mind off all of his issues. At least I'll have projects to work on in the dr.'s office right?!
I have a whole line of the StarWars guys I want to get the patterns written for and them completed too. It's been hard since my youngest child has been going through some feeding issues and delays, so hopefully I'll find more time to knit and crochet to help keep my mind off all of his issues. At least I'll have projects to work on in the dr.'s office right?!
Sunday, May 10, 2009
Sweaters in the summer?!


It's going to take me until winter to finish this most likely. LOL Chewy's fall sweater. Great pattern, just takes forever when you knit a few rows then hop on facebook. knit a few rows, go make dinner, knit a few rows, back to facebook. ;)
Thursday, February 26, 2009
Crocheted toy pillows... Star Wars Fleet
I found this pattern for Rudy the Rectangle at Michaels. Instantly fell in love. Here is my first Rudy for Chewy.


Then Cartman wanted an "orange jedi" one. so this is what I came up with. He calls him anakin, but he reminds me more of plo-koon (and he's obsessed with the movies, not me, took me 3 months to figure out what the hell a 'plo-koon' even was! Google that shiz.)
Now I am inspired. I'm creating a whole jedi fleet. Even a few from the Dark Side. Watch for more guys either here or on Ravelry. Here is Yoda...
May the Yarn be with you...
Monday, February 16, 2009
The life of a mom...
I haven't posted in a long time. sorry about that! Sick kids, went on a mini vacation, been knitting up a storm and just finished the book Friday Night Knitting Club. I'm working on some new coffee cozy patterns and possibly an ipod case, so stay tuned. :)
Sunday, January 18, 2009
Skater Baby photo instructions on Brim
Here are some photo instructions on making the brim of the Skater Baby hat


Knit like you would a regular stitch


Eventually you will add the brim. the wrapped plastic canvas is bendable, use this to your advantage when trying to work around the stitches. Don't get too frustrated if it's tight and difficult. it will get easier and you can push the brim through more of the hat if needed. Push it out of your way, into the closed casing.


I cut a 6 inch strip of plastic canvas. I created a curve that made the entire piece 1 - 1.25 inches wide.

Next I wrapped it in duct-tape. This helps prevent snags while inserting, makes it harder to see through the stitches and also provides a bit more stability so you can bend it.

Fold the knit fabric so the Cast on edge (CO) is on top. Insert your needle through the first stitch on the CO round and the first stitch on the round on the needles.


Knit like you would a regular stitch

And pull through both stitches.


Eventually you will add the brim. the wrapped plastic canvas is bendable, use this to your advantage when trying to work around the stitches. Don't get too frustrated if it's tight and difficult. it will get easier and you can push the brim through more of the hat if needed. Push it out of your way, into the closed casing.


May the Felt be with you… Felted Lightsaber ~ baby size

Felted Lightsaber ~ baby size
May the Felt be with you…
© Emily V (aka Coffeebra!)
Yarn:
Feltable wool. I used Patons Classic Merino in gray and leaf green.
Size 11 DPNs
Cotton batting/stuffing
Gauge – to be honest I didn’t bother with it.
Cast on 15 stitches in Gray wool and distribute evenly amongst 3 DPNs. Using the 4th DPN, knit approx 20 rounds. Switch to the Green.
Knit 15 rounds
Next round: *k2tog, k3, repeat * to end (12 stitches)
Knit 15 rounds
Next round: *k2tog, k2, repeat * to end (9 stitches)
Knit 9 rounds
Next round: knit 3, k2tog, knit 4 (8 stitches)
Knit 5 rounds
Next round: k2tog, knit 2, k2tog knit 2 (6 stitches)
Knit a couple more rounds
Next round: k2tog all stitches (3 remain) and leave a 6 inch tail. Draw through remaining stitches and weave in the ends, leaving the bottom (cast on edge) open.
Stuff with batting/cotton and seam the open edge closed. Felt as you normally would. (I have a front loader so I use 1 capful of Charlie’s detergent and put project in a pillow case. I throw in a towel or pair of jeans and do a “speed wash” with an extra fast spin)
Shape the felted project and lay to dry. Felt a second time if needed.
You may add decorations, sew on buttons and such for an older child. My proect was for a 6 month old, so I left off all adornments.
This projects, if knit in all brown with a red tip can also be made as a Harry Potter or sorcerers wand.

Friday, January 16, 2009
Skater Baby!

I knit this super simple hat for Chewy, my youngest. It's sooooo cute on him!!! Below is the pattern. For the brim, I actually dismantled a cheapie store bought hat and stole the brim from that one, but I've seen online that you can cut one from plastic canvas. I do not have a template for that right now, but will make one up and post soon.
Skater Baby! ~ Brim Hat
© Emily V (aka Coffeebra!)
Size: Childrens – 6-12 months (You can adjust the size by
adding or decreasing the cast on stitches by multiples of 8)
Yarn – Aran/Worsted weight “4”, I used Mission Falls 1824
Wool.
Needle – US size 7, 16” circular needles, Cable needle and US
size 7 DPNs
Also will need a stiff brim of sorts. You can make one out of
plastic canvas or thick cardboard. I used the brim from a cheapie hat I bought. (if you are making your own brim, the measurements I used were 6inches across, 1.25 inches wide and a slight curve. You can take a 2 inch thick piece of material (whichever you have chosen) and make sure when you draw a pattern that there is a slight curve but that the brim material doesn't exceed being 1.25 inches wide at the thickest part. Also, if you wrap the plastic canvas in duct-tape, it provides a much easier glide and more stability.
Gauge – 20 stitches, 28 rows 4x4 inches
Cast on 72 stitches. Place marker and join in a round, being careful not to twist. Work in k2p2 ribbing for 16 rounds, or until piece measures 2 inches.
Fold brim to inside and prepare to join to current round to form casing. Insert left-hand needle into first st from the cast-on round, then k2tog with first st of current round. *Insert left-hand needle into next st from cast-on round, then k2tog with next st of current round; rep from * to approx halfway across round. At this point, insert your plastic brim so that half of it is inside your casing and half is out. Continue to form casing, pulling the knit brim up on top of the plastic brim and encasing the plastic brim as you work. The casing should fit snugly around the plastic brim.
Once you have joined the entire brim around, knit all stitches for approx 5 inches. You can join a new color to make stripes. In the hat pictured I did 8 rounds of the main color (MC) and then 3 rounds of the contrasting color (CC), then 3 rounds of MC and 2 rounds of CC and finished the hat in MC. (note: where the plastic brim is the widest, the stitches will be tight to maneuver for a couple of rounds. Just try to knit a little looser in that area to help ease things fro the next roound.)
Begin decreasing the hat with the following pattern…
Decreases (changed 1/17/08 for better shaping):
Row 1: K6, k2tog (63 stitches)
Row 2: K5, k2tog (54 stitches)
Row 3: K4, K2tog (45)
Row 4: Knit
Row 5: Knit
Row 6: K3, K2tog (36)
Row 7: Knit
Row 8: Knit
Row 9:
Row 10: Knit
Row 11: K1, K2tog (18)
Row 12: Knit
Row 13: K2tog (9)
Break yarn leaving a 6 in tail, thread through remaining stitches and draw up tightly. Fasten and weave in
ends.
Free for personal use, please do not make these to sell. If you do I might have to hunt you down and hit you with one of my muppet fur thongs. It's a free pattern, so no need to get all piratey. ;)


Wednesday, January 14, 2009
Baby Brim Hat
This is turning out soooo cute!!!! I can't wait to finish and post pictures. I'll post my pattern too. not too creative, just a basic hat but with a k2p2 brim that's folded over and knit up to avoid seams/sewing. I put a piece of plastic (actually stole that from a cheapie store bought brim hat) in the brim while I was knitting it closed so it curves and is just too cute for words. :)
Pics are a coming!
Monday, January 12, 2009
Knitting at the gym...
Anyone try it?! A friend mentioned knitting while on the recumbant bike. I soooooooo need to try this! I'm way behind in the hat for my youngest, hell, winter will be over by the time I have it done at this rate! Maybe I should take the needles to the gym. ;)
Subscribe to:
Posts (Atom)
